A DIY Fire Pit Guide
The long, sun-soaked days of summer call for outdoor feasts, casual gatherings, and the warm glow of a fire pit to set the mood. Building your own fire pit is a rewarding DIY project that can transform your backyard into a cozy haven for year-round enjoyment. Imagine evenings spent bundled in a favorite blanket, sipping a drink, roasting marshmallows, and enjoying the company of family and friends.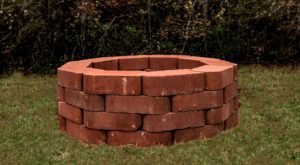
Even for those new to DIY projects, constructing a fire pit is an achievable goal. With the right materials and a bit of guidance, you can create an inviting centerpiece for your outdoor space. Here’s a step-by-step guide to building a fire pit that will keep you basking in its warmth all year long.
Gathering Materials and Tools
You don’t need a large budget or expensive equipment to get started. Essential supplies include brick or paving stones made from heat-resistant materials such as slate, granite, or refractory brick. Avoid river stones, as they can crack or even explode when exposed to high heat. You’ll also need a shovel, sand, gravel, a rake, a rubber mallet, measuring tape, wooden stakes, string, marking paint, and optionally, a tarp or wheelbarrow for moving dirt.
Choosing the Perfect Spot
The location of your fire pit matters for both functionality and safety. Look for a flat, well-drained area that offers enough space for seating arrangements. Ensure the pit is at least seven feet away from any structures, play areas, or greenery to minimize fire hazards. If you plan to host larger gatherings, consider the type and size of furniture that will surround your fire pit. Adirondack chairs are great for lounging, while sleek benches can maximize seating capacity.
Marking Your Fire Pit’s Location
Once you’ve chosen the spot, define the boundaries of your fire pit. Drive a wooden stake into the center of your desired location and tie a string to it. The string should be half the length of your intended fire pit’s diameter, which typically ranges from 36 to 44 inches. Walk in a circle around the stake, marking the outline with spray paint.
Preparing the Ground
With the perimeter marked, begin digging out the fire pit. Dig to a depth of four to eight inches, ensuring the base remains level. If the ground slopes, dig deeper on the high side to create an even surface. Use gloves to protect your hands and take breaks as needed, especially on hot days. Place the removed soil on a tarp or in a wheelbarrow for easier disposal.
Laying the Foundation and Building the Wall
Start by spreading a two-inch layer of sand across the bottom of the fire pit. Use a rake to level the sand and compact it to form a sturdy base. Arrange the first layer of bricks or stones around the perimeter, tapping them into place with a rubber mallet. For the second layer, stagger the bricks so that the seams don’t align with those of the first layer. Continue alternating layers, maintaining slight gaps between stones to allow airflow. Build the wall to a height of 12 to 20 inches, depending on your preference.
Adding Gravel for the Base
Finish your fire pit by filling the center with four inches of crushed stone or pea gravel. This layer helps with drainage and provides a stable surface for your firewood or fire bowl.
Enjoying Your New Fire Pit
With your fire pit complete, it’s time to enjoy your creation. Whether hosting a family cookout, a quiet evening with loved ones, or a lively gathering with friends, your fire pit will serve as the perfect focal point. There’s something timeless and special about gathering around a fire, sharing stories, and creating memories under the stars.
Building a fire pit is more than just a DIY project; it’s an opportunity to enhance your outdoor living space and bring people together. So grab your tools and start creating a warm, inviting retreat that will be the highlight of every season.